


MUCH MORE OF THE SAME
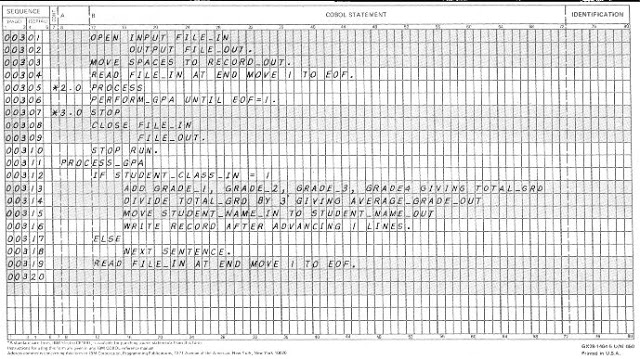
I’ve been working with IT for more than 30 years. When I started around the 80’s, it was not even called “IT”. Actually, my first contact with this universe was around the 70’s when I was fourteen and I took my first Cobol programing language course. At that time, computers were restricted to big corporations, universities and government and my course was entirely on “coding forms” (a form with the same amount of columns of the punched cards).
I started to work with computers before the PCs were commercially available, so I had opportunity to work with the first personal computers (TRS-80, Apple II and ZX Spectrum), microcomputers, minicomputers, mainframes and I must admit I was getting “bored” with IT lately. Although it has evolved a lot over time, I’ve not seen anything really new for a long time.
Take a look on the storages, for example: they increased a lot on capacity and availability but is “conceptually” similar to an external hard disk and makes me remember those huge “wardrobes” used on the mainframes.
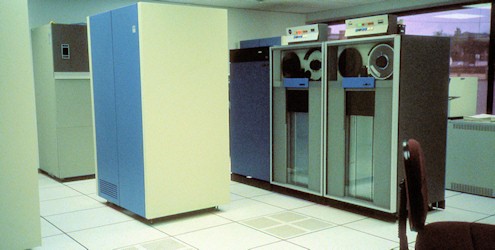
The blue cabinet on the photo was a typical hard disk housing and the CPU used another similar cabinet (the tape units were really cool: you just had to put reel tape on one side, push a button and a vacuum system “sucks” the tape tip to the other reel).
Talking about mainframes, the IBM’s VM-SP operating system I used to work on a 4381 mainframe on the 80’s was already capable to provide several virtual machines running on a single CPU, so virtualization is not a new concept. It took more than 15 years (around 2008) for me to see the first VMWare version running on my desktop, which was very cool because I was able create test machines.
During my career, I dedicated an expressive amount of time to study Information Security and I always became concerned about Business Continuity Plan. Even with a good backup policy, in case of a catastrophic disaster it would take several days and probably weeks to restore the IT services in most cases. Most of the companies are not prone to invest in a mirror site with all the necessary infrastructure (air conditioning, fire prevention, data links, servers, routers, etc) that maybe will never be used. However, if you don’t have a mirror site, where can you deploy the applications after the disaster? How much time will be required to configure new servers? Is there a written (and updated) procedure to configure all the applications and servers?
Let’s face the reality: the majority of the companies does not have a feasible disaster recovery plan and actually rely on lucky to survive a catastrophic disaster.
NEWS PERSPECTIVES AND FRESH AIR
I’ve never had opportunity to work with Cloud Services and from occasional readings I had a misconception that it was all about Infrastructure as a Service (IaaS). A few days ago, I started to look the Amazon Web Services (AWS) portfolio and… “What!?? Serverless application!!?? No need to worry about hardware capacity!?? Instant server provisioning!!?? “Machine learning” available to ordinary developers!!?? Internet of Things ready to use platform???”
I got really impressed and amazed with their huge “ecosystem” and paradigm breaking services. My feelings says that we are in front of a new revolution on IT scenario and I got really excited to take a ride on this wave, so I decided to start playing around with EC2.
I’ve always read that AWS was a good solution for occasional high demanding computer power, but I always thought of contacting some vendor to ask for some virtual machines and wait to be provisioned, and bla, bla, bla… but it’s not!! Once you have an account, you can deploy new virtual machines in seconds using web interface or you can do it programmatically!!
Let’s say you have a nightly batch routine at your company and it is high demanding computer power process. The amount of data is growing and you’re about to blow up the batch processing window. The usual approach would be considering buying new hardware, but you also have to consider the data growth for reasonable lifetime of the new hardware. To make decisions hard, once in a month there is the monthly processing batch with an even higher computer power demand. During daytime, however, the server stays almost idle. So, you will invest a considerable amount of money in a new powerful hardware that will stay almost idle for most of the time?
With AWS you could keep a sync copy of you database, programmatically deploy the servers before the nightly batch and decommission them right after the routine ending. This approach is very interesting because you only pay for the time of the batch routine run. You don’t have to pay for idle servers!
Let’s consider the Disaster Recovery mentioned earlier. You can setup (and test) a whole environment to support your applications, create snapshots of servers and terminate their running instances. I case of disaster, you can bring the servers to life just running a setup script!
Of course, you have to consider an update routine for the snapshots. Data can be kept sync either with database online replication or restoring from a backup stored at Glacier service, for example.
You also have to take into account that it is definitively not a solution for legacy file based applications and may not be suitable for client-server applications due to network latency and bandwidth limitations.
PROOF OF CONCEPT
To learn a bit of AWS, I decided to make this small proof of concept to check how ease would be to deploy an environment programmatically. Using the web interface, I created a single LAMP server and saved as a machine image (AMI). From that image, I could start new instances of this server but I created Launch Templates for simple deployment.
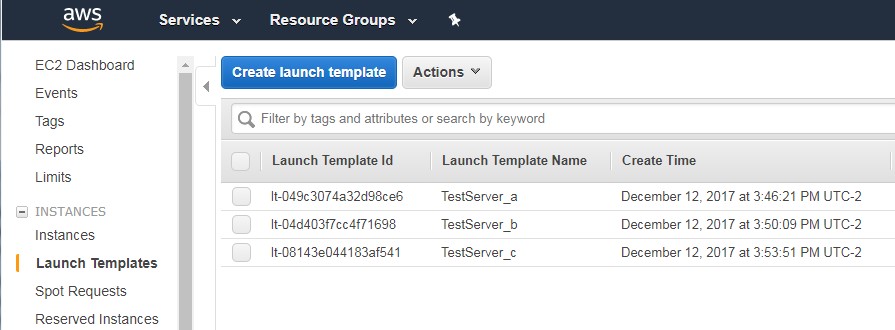
Launch Templates
I created three templates, one for each availability zone using the same image.
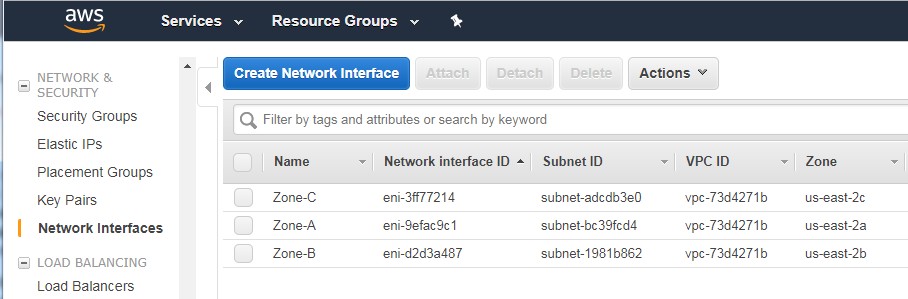
Network Interfaces
Each server template is tied to its availability zone by the network interface used.
The final configuration of this POC is just a small infrastructure with two LAMP servers behind a load balancer exposed to the Internet.
Several different programing languages can be used for AWS automation. I like to use Python on my scripts. It is powerful, flexible and natively available on most Linux distributions, although I have used Python for Windows for these tests. AWS recommends BOTO3 library to provide high level API for Python on AWS management, but as far as I saw, it has a limited set of classes.
To overcome BOTO3 limits, I decied to use Python’s subprocess module for shell command calls and make use of Command Line Interface (CLI) provided by AWS. Subprocess allows me to capture the AWS command’s output and it’s JSON format can be parsed to easily extract any information.
The test script takes less than a minute to complete and show some data to access each server individually and the Load Balancer URL.
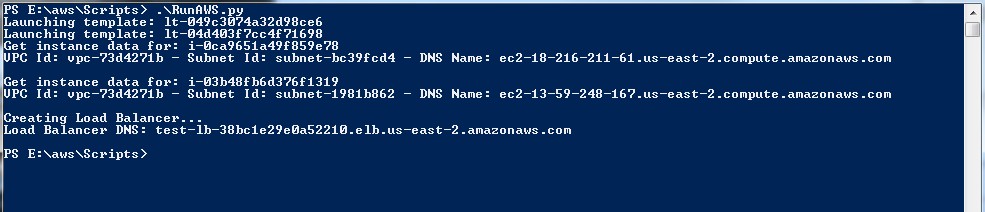
Script output
To confirm that the solution is working fine, just copy the Load Balancer DNS name and paste on the browser.
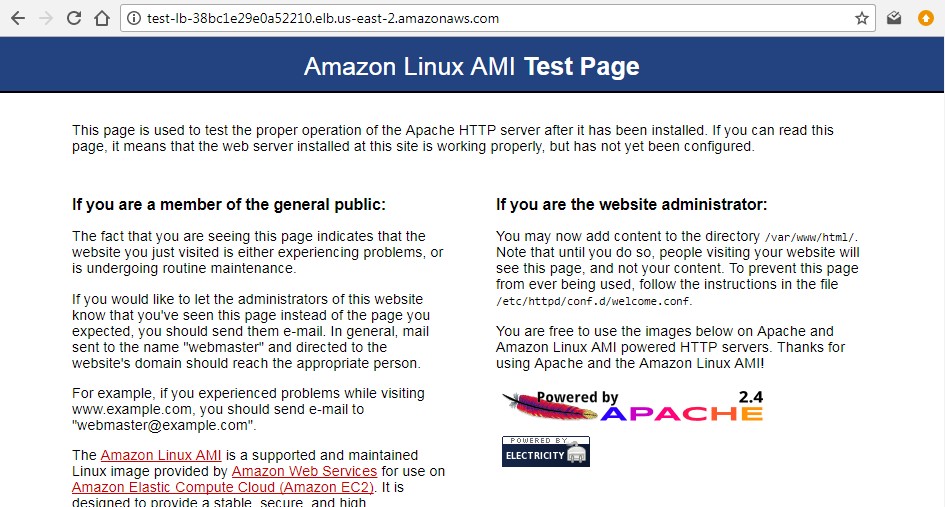
Load Balance URL
THE SCRIPT
If you wish to reproduce the test or create your own provisioning script, check the code below.
import subprocess
import json
import sys

def main():
   #Launch Template TestServer_a (lt-049c3074a32d98ce6)
   templateId = "lt-049c3074a32d98ce6"
   print("Launching template: {}".format(templateId))
   instId1 = runInstance(templateId)

   #Launch Template TestServer_b (lt-04d403f7cc4f71698)
   templateId = "lt-04d403f7cc4f71698"
   print("Launching template: {}".format(templateId))
   instId2 = runInstance(templateId)

   #Get 1st Instance Data
   print("Get instance data for: {}".format(instId1))
   DNSName1, subnetId1, vpcId = getInstanceData(instId1)
   print("VPC Id: {} - Subnet Id: {} - DNS Name: {}".format(vpcId, subnetId1, DNSName1))
   print("")

   #Get 2nd Instance Data
   print("Get instance data for: {}".format(instId2))
   DNSName2, subnetId2, vpcId = getInstanceData(instId2)
   print("VPC Id: {} - Subnet Id: {} - DNS Name: {}".format(vpcId, subnetId2, DNSName2))
   print("")

   #Create Load Balancer
   print("Creating Load Balancer...")
   lbDnsName = createLB(instId1, instId2, subnetId1, subnetId2, vpcId)
   print("Load Balancer DNS: {}".format(lbDnsName))
   print("")

#end main

def runInstance(templateId):
   #Start Instance
   cmd = "aws ec2 run-instances --launch-template LaunchTemplateId="+templateId
   js = runCmd(cmd)

   return js["Instances"][0]['InstanceId']
#End runInstance

def getInstanceData(instId):
   #Wait instance to be available
   cmd = "aws ec2 wait instance-running --instance-ids "+instId
   ret=subprocess.call(cmd) # there's no output to get
   if ret != 0:
      sys.exit(ret)

   #Get instance data
   cmd = "aws ec2 describe-instances --instance-ids "+instId
   js = runCmd(cmd)
   DNSName = js["Reservations"][0]["Instances"][0]['PublicDnsName']
   subnetId = js["Reservations"][0]["Instances"][0]['SubnetId']
   vpcId = js["Reservations"][0]["Instances"][0]['VpcId']

   return DNSName, subnetId, vpcId
#End getInstanceData

def createLB(instId1, instId2, subnetId1, subnetId2, vpcId):
   #Create Load Balancer
   cmd = "aws elbv2 create-load-balancer --name test-lb --type network --subnets " + \
   subnetId1 + " " + subnetId2
   js = runCmd(cmd)
   lbDnsName = js["LoadBalancers"][0]["DNSName"]
   lbArn = js["LoadBalancers"][0]["LoadBalancerArn"]

   #Create target group
   cmd = "aws elbv2 create-target-group --name test-targets --protocol TCP --port 80 --vpc-id "+vpcId
   js = runCmd(cmd)
   targetArn = js["TargetGroups"][0]["TargetGroupArn"]

   #Register tags
   cmd = "aws elbv2 register-targets --target-group-arn "+ \
   targetArn+" --targets Id="+instId1+" Id="+instId2
   ret=subprocess.call(cmd) # there's no output to get
   if ret != 0:
      sys.exit(ret)

   #Create listener
   cmd = "aws elbv2 create-listener --load-balancer-arn "+ \
   lbArn+" --protocol TCP --port 80 --default-actions Type=forward,TargetGroupArn="+targetArn
   js = runCmd(cmd)

   return lbDnsName
#End createLB

def runCmd(cmd):
   try:
      output = subprocess.check_output(cmd)
   except:
      raise
   return json.loads(output)
#End runCmd

if __name__ == "__main__":
   main()
CONCLUSION
AWS has an extensive set of solutions to provide a flexible infrastructure to your company. I did not dive into the economic aspects but I’m pretty sure that AWS costs are considerably lower than running on-premises infrastructures if you consider the costs of hardware (servers, storage, network appliances, etc) and all the surrounding infrastructure (UPSs, air conditioning, fire prevention, physical security, power supply, data links, etc). Different availability zones is a plus providing high availability for unbeatable lower costs than building you own on-premises mirror sites.